Olan Suddeth
Dad. Computer geek.Homebrewer. Disney nut.
Would-be crafty guy.

Amazon
Save Money
Ibotta
Fetch Rewards
(use code "116YB")


 Get ready for a super complicated sewing tutorial if you want to make blankets like these!
Along the years, I have become the go-to guy in our household for minor clothing repairs. If a seam is broken, if a button comes off of a shirt, if a beloved stuffed animal starts to lose an arm... it's time for dad to break out the needle and thread. Once upon a time, I did more than that - for Silas' birthday one year, I borrowed a sewing machine and created a bunch of dinosaur tails for the kids to wear at the party. As a matter of fact, there may still be a youtube video floating around of me wearing one of those tails while leading the kids in a song...
But that's a story for another post.
This past fall, Donna and I were talking about how it was too bad that we didn't have a sewing machine for this or that project, though my wife did freely admit that she didn't really have the patience for a machine. I observed that I did, in fact, have said patience, and that I would like to maybe create some things here and there. When Black Friday rolled around, we came across an ad for an incredible deal on a Singer Start sewing machine at our local JoAnn Fabric... and so, we picked one up in the midst of the other carnage of that day. I also went ahead and grabbed a few fat quarters of fabric to play with, thinking that a couple of doll blankets would be a simple way to get to know my new machine - and would be well appreciated by my two and three year old daughters.
In case you were unfamiliar with the term (like I was), a fat quarter is a quarter yard of fabric. However, instead of simply cutting it into the thin strip, length-wise, that would measure a quarter yard - aka a nine inch strip, that wouldn't be very useful - the cloth is instead cut into an eighteen inch wide, twenty-two inch long rectangle. This "fatter" piece makes for a great size for various crafts and sewing applications. Pretty much all craft stores carry these for a couple of dollars each; even our local Wal Mart has them in their limited sewing area. With the Black Friday coupons, I was able to pick up the quarters for a dollar each, with thread being a similar cost.
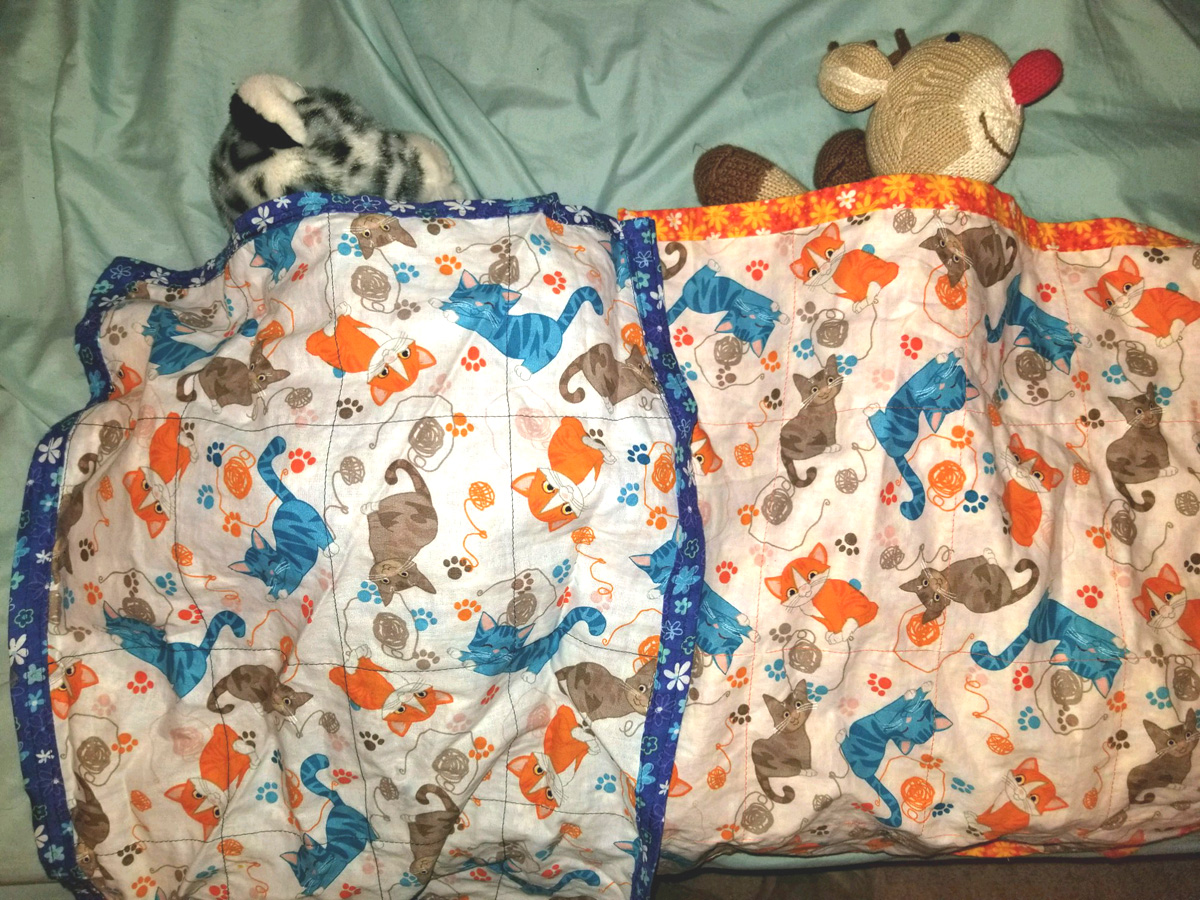
I chose a cute kitten pattern fabric for two of my quarters, with coordinating pieces of blue and orange patterns. While there are tons of tutorials out there for this and that - trimming the edges with bias tape, fancying things up with different techniques - I felt that the best approach for this was to go utterly simple.
 This is my super fancy, super sophisticated doll blanket pattern.
I took my kitten fabric and trimmed about three inches off of both dimensions. I then spread out the backing fabric, face down, and pinned the kitten fabric on top, face up (in other words, the "right" sides for each fabric faced out), with pins a few inches apart. To attach, I first sewed a line down the middle of the fabric horizontally, then repeated the same thing twice more in even intervals. I then rotated the fabric ninety degrees, sewing another line of stitches down the middle vertically, then repeating again in even intervals. As of now, the two pieces were fully attached with a faux quilted look.
Next, I folded the edges of my backing fabric roughly in half over the front of the kitten fabric, making sure to tuck the ragged edge underneath. The edges were then pinned in place, and I made two passes around the permimeter with my machine. Nothing special was done for the corners; I simply squared them off, only making sure to fold them all the same direction so as to keep things uniform.
 These blankets are approved by none other than Minnie Mouse and Princess Aurora. High praise, indeed!
The first blanket probably took me an hour or so to complete; the second was noticeably quicker, as I started to figure out the machine and the right way to carry out the various steps.
What's really important though, is that they turned out pretty fantastic. Yes, me just eyeballing the "quilting" stitches led to them being a bit crooked... not that the girls mind one bit. These blankets are well loved and used all the time, as we apparently have a true epidemic of cold stuffed animals and dollies in our house. And if I can help combat this problem for two or three dollars' worth of materials and a little of my time, that seems like a worthy investment to me.
Tags for this post: Sewing
Permalink
Please share this post!


If you enjoy HomeBrew Dad, please support the site by using my Amazon affiliate link when doing any shopping there. All prices are exactly the same, but HomeBrew Dad will receive a commission on your purchases. Thanks!
